(26 intermediate revisions by the same user not shown)
Line 1:
Line 1:
+
−
[[File:File.jpg|thumb|File Menu]]
+
+
+
==FILE MENU==
==FILE MENU==
+
[[File:File.jpg|thumb|File Menu]]
−
<br />
−
==NEW==
−
Create a new map. Select the size the map should have an click on OK.<br />Keyboard Shortcut: '''CTRL + N'''<br />
−
==OPEN<br />==
−
Open an existing map. In the dialogue, navigate the directory tree to find the map. Then, click OPEN.<br />Keyboard Shortcut: '''CTRL + O'''
−
==SAVE<br />==
−
Save changes you made to an existing map. If the current map is new, then you must enter a filename.<br />Keyboard Shortcut: '''CTRL + S'''
−
==SAVE AS...<br />==
−
Save the current map under a filenamenter a filename.<br />Keyboard Shortcut: '''CTRL + SHIFT + S'''
+
−
==Close==
+
+
==='''NEW'''===
+
+
Create a new map. Select the size the map should have an click on OK.<br />
+
Keyboard Shortcut: '''CTRL + N''' For more informations click [http://battleforge.wikia.com/wiki/New_Map here].
+
+
==='''OPEN'''<br />===
+
Open an existing map. In the dialogue, navigate the directory tree to find the map. Then, click OPEN.<br />
+
Keyboard Shortcut: '''CTRL + O'''
+
+
==='''SAVE'''<br />===
+
Save changes you made to an existing map. If the current map is new, then you must enter a filename.<br />
+
Keyboard Shortcut: '''CTRL + S'''
+
+
==='''SAVE AS...'''<br />===
+
Save the current map under a filenamenter a filename.<br />
+
Keyboard Shortcut: '''CTRL + SHIFT + S'''
+
==='''Close'''===
Close the current map.
Close the current map.
+
−
==New Random Map==
+
==='''New Random Map'''===
−
Opens a window where you can create a random generated map. For a detail description click here.
+
Opens a window where you can create a random generated map. For a detail description click [http://battleforge.wikia.com/wiki/Random_Map_Generator here].
−
==IMPORT HEIGHTMAP==
+
−
Import a picture with height information into the map to create the landscape. You have to load or create a new<br />map before, to use this feature.
+
==='''IMPORT HEIGHTMAP'''===
+
Import a picture with height information into the map to create the landscape. You have to load or create a new<br />
+
map before, to use this feature.
The picture has to be the same size like the map. If the map has the size of 512x512, then the picture has to be the same size in pixel.
The picture has to be the same size like the map. If the map has the size of 512x512, then the picture has to be the same size in pixel.
−
You can set the height of the heightmap in the Import Heightmap window. You can set on which height, in<br />meter, the color white in the heightmap shall be. All the other height informations will be calculated accordingly<br />of this size.<br />
+
You can set the height of the heightmap in the Import Heightmap window. You can set on which height, in<br />
+
meter, the color white in the heightmap shall be. All the other height informations will be calculated accordingly<br />
−
==EXPORT HEIGHTMAP==
+
of this size.<br />
−
Export the height information into a picture. You have to choose the filename and location where you want to save the picture.<br />After saving the picture you receive informations about the map, what the size of the map is and what the heightest point in the map is.<br />If you want to import this heigthmap then you can use thise height information to get the same map.<br />
+
==='''EXPORT HEIGHTMAP'''===
−
==RECENTLY USED FILES==
−
Shows you the lastusedmaps. Perdefaultyouwill see the last10maps.<br/>Toopenamap,clickonit.<br />
+
Export the height information into a picture. You have to choose the filename and location where you want to save the picture.<br />
+
After saving the picture you receive informations about the map, what the size of the map is and what the heightest point in the map is.<br />
−
==QUIT==
+
If you want to import this heigthmap then you can use thise height information to get the same map.<br />
+
==='''RECENTLY USED FILES'''===
+
Shows you the last used maps. Per default you will see the last 10 maps.<br />
+
To open a map, click on it.<br />
+
==='''QUIT'''===
Close the editor. If the map is in an unsaved state, then a dialogue will open, where you can change if you want to save the map, discard your changes or cancel the close action.
Close the editor. If the map is in an unsaved state, then a dialogue will open, where you can change if you want to save the map, discard your changes or cancel the close action.
+
+
Keyboard Shortcut: '''CTRL + Q'''
+
+
==Edit Menu==
+
+
+
[[File:Edit.jpg|thumb|Edit Menu]]
+
+
==='''UNDO'''===
+
+
Remove the last operation performed on your map.<br />
+
Keyboard Shortcut: '''CTRL + Z'''<br />
+
+
==='''REDO'''===
+
+
Perform again the last operation that was undone.<br />
+
Keyboard Shortcut: '''CTRL + SHIFT + Z'''<br />
+
+
==='''HISTORY'''===
+
+
Open the History window, that allows you also to Undo and Redo your work.<br />
+
Keyboard Shortcut: '''CTRL + Z'''
+
+
==='''Copy'''===
+
Copies an entity (building, unit, object...) into the temporary buffer storage.<br />
+
Keyboard Shortcut: '''CTRL + C'''
+
+
==='''Paste'''===
+
Paste an entity from the temporary buffer storage into your map.<br />
+
Keyboard Shortcut: '''CTRL + V'''
+
==TOOLS MENU==
+
[[File:Tool.jpg|thumb|Tool Menu]]
+
===<br />'''SELECTION'''===
+
+
Activates the Selection mousetool, which allows you to select entities in the map. Detail information [http://battleforge.wikia.com/wiki/Selection here]<br />Keyboard Shortcut: '''Q'''
+
+
==='''HEIGHT MODIFIER'''===
+
Activates the Height mousetool, which allows you to change the height of a map in a additive way.<br />Keyboard Shortcut: '''H'''
+
==='''FIXED HEIGHT MODIFIER'''===
+
Activates the Fixed Height mousetool, which allows you to set party of a map to a fixed height.<br />Keyboard Shortcut:''' F'''
+
==='''TERRAIN SMOOTHING'''===
+
Activates the Smoothing mousetool, which allows you to flatten parts of a map, when they are too rough.<br />Keyboard Shortcut: '''S'''
+
==='''TEXTURE MODIFIER'''===
+
+
Activates the Texture mousetool, which allows you to paint textures with a fixed opacity on a map .<br />Keyboard Shortcut: '''T'''
+
+
==='''ADDITIVE TEXTURE MODIFIER'''===
+
+
Activates the Additive Texture mousetool, which allows you to paint textures with additive opacity.<br />Keyboard Shortcut: '''A'''
+
+
==='''OBJECT PLACEMENT'''===
+
+
Activates the Object mousetool, which allows you to place objects in a map.<br />Keyboard Shortcut: '''O '''
+
==='''SQUAD PLACEMENT'''===
+
+
Activates the Squad mousetool, which allows you to place squads in a map.<br />Keyboard Shortcut: '''U '''
+
==='''BUILDING PLACEMENT'''===
+
+
Activates the Building mousetool, which allows you to place buildings in a map<br />Keyboard Shortcut: '''B '''
+
==='''MISC PLACEMENT'''===
+
+
Activates the Misc mousetool, which allows you to place misc entities, such as Static Building Places, in a map. Keyboard Shortcut: '''M '''
+
==='''TERRITORY MODIFIER'''===
+
+
Activates the Territory mousetool, which allows you to paint territories in a map.<br />Keyboard Shortcut: '''Y'''
+
==='''FORTRESS MODIFIER'''===
+
+
Activates the Fortress mousetool, which allows you to place building zones for fortresses in a map.<br />Keyboard Shortcut: '''R'''
+
+
==='''ATMO ZONE MODIFIER'''===
+
+
Activates the Atom Zone mousetool, which allows you to paint atomspheric sound zone in a map.<br />Keyboard Shortcut: '''Z'''
+
+
==='''EFFECT ZONE MODIFIER'''===
+
+
Activates the Effect Zone mousetool, which allows you to paint effect zones in a map, which affects all sounds that will be played within this tone<br />Keyboard Shortcut: '''X'''
+
+
==='''BLOCKING MODIFIER'''===
+
+
Activates the Blocking mousetool, which allows you to paint blocking information in a map.<br />Keyboard Shortcut: '''L'''
+
+
==='''HEIGHT TOOL'''===
+
+
Open the Properties Window for the Height Tool, where you can adjust the settings for the Height Modifier, Fixed Height Modifier and Terrain Smoothing mousetools.<br />Keyboard Shortcut: '''SHIFT + F'''
+
+
==='''TEXTURE TOOL'''===
+
+
Open the Properties Window for the Texture Tool, where you can create texture layers and assign texture the layers before painting them on the map.<br />Keyboard Shortcut: '''SHIFT + T'''
+
+
==='''ENTITY PLACEMENT'''===
+
+
Open the Properties Window for the Entity Placement, where you can place squads, buildings, objects and misc entities.<br />Keyboard Shortcut: '''SHIFT + E'''
+
+
==='''ENTITY PROPERTIES'''===
+
+
Open the Properties Window for selected Entities, where you can change the properties of the entity or entities.<br />Keyboard Shortcut: '''SHIFT + P'''<br />
+
+
==='''ENTITY LIST'''===
+
+
Open the Entity List Window, where you can search for entities and get a better overview about the placed entities.<br />Keyboard Shortcut: '''SHIFT + L'''
+
+
==='''TERRITORY TOOL'''===
+
+
Open the Properties Window for the Territory Tool, where you can create territories, delete them and adjust the settings of the Territory Modifier.<br />Keyboard Shortcut: '''SHIFT + Y'''
+
+
==='''FORTRESS TOOL'''===
+
+
Open the Properties Window for the Fortress Tool, where you can adjust the settings of the Fortress Modifier, create new blocking zones and delete unused ones.<br />Keyboard Shortcut: '''SHIFT + R'''
+
==='''SOUND TOOL'''===
+
Open the Properties Window for the Sound Tool, where you can adjust the settings of the Sound Modifier and change the properties of placed sound zones.<br />Keyboard Shortcut: '''SHIFT + Z'''
+
+
==='''BLOCKING TOOL'''===
+
+
Open the Properties Window for the Blocking Tool, where you can adjust the settings of the Blocking Modifier and choose the type of blocking.<br />Keyboard Shortcut: '''SHIFT + B'''
+
+
==='''GRID MANAGER'''===
+
+
Open the Grid Manager Window, where you can turn on the snap to grid option for placing entities and where you can manage your grids, create new help grids and delete old ones.<br />Keyboard Shortcut: '''SHIFT + G'''
Load a weather file into the map. A weather file is used to define the atmosphere like the density of the fog, the air colors, etc... In the dialogue window, navigate the directory tree to find the file. Then, click OPEN.
+
+
==='''DELETE RENDERSETTINGS'''===
+
+
Unload the currently assigned weather file from the map.
+
+
==='''REFRESH RENDERSETTINGS'''===
+
+
Reload the assigned weather file.
+
+
==='''TEAM SETUP & PLAYER KITS'''===
+
+
Open the window that allows you to create team setups and player kits, which are needed to run your map.
+
+
Detail information [http://battleforge.wikia.com/wiki/Team_Setup_&_Player_Kits here]
+
+
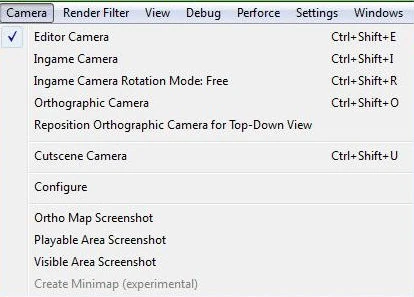
==CAMERA MENU==
+
[[File:Camera_Menu.jpg|thumb|Camera Menu]]<br />
+
+
==='''EDITOR CAMERA'''===
+
+
Activate the editor camera, which can be moved, rotated and zoomed without restrictions.
+
+
==='''INGAME CAMERA'''===
+
+
Activate the ingame camera, which can be moved and rotated. This Camera is the same that I used in the game. Keyboard Shortcut: '''CTRL + SHIFT + E'''<br />Keyboard Shortcut: '''CTRL + SHIFT + I'''
+
+
==='''CONFIGURE'''===
+
+
Open the configuration window which allows you to change the scroll speed and inverting of the camera controls.
+
==RENDER FILTER MENU==
+
[[File:Render_Filter.jpg|thumb|Render Filter]]
+
+
<br />
+
+
==='''FILTER OBJECTS'''===
+
+
Toggle display of objects in the map.
+
+
==='''FILTER SQUADS'''===
+
+
Toggle display of squads in the map.
+
+
==='''FILTER BUIDLINGS'''===
+
+
Toggle display of buidlings in the map.
+
+
==='''FILTER WATER'''===
+
+
Toggle display of water in the map.
+
+
==='''FILTER ZONES'''===
+
+
Toggle display of zones, like atmo zones, in the map.
+
+
==='''FILTER MISC'''===
+
+
Toggle display of misc entities, like static building places, in the map.
+
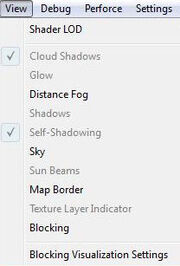
==VIEW MENU==
+
[[File:View_Menu.jpg|thumb|View Menu]]
+
+
==='''Shader LOD'''===
+
+
Here you can choose the Shader "Level Of Detail", from Low, Medium, High and very High.
+
+
==='''Cloud Shadows'''===
+
Toggles clouds shadows on or off.
+
==='''Glow'''===
+
Toggles glow on or off.
+
==='''Distance Fog'''===
+
Toggles distance fog on or off.
+
==='''Shadows'''===
+
Toggles shadows on or off.
+
==='''Self-Shadowing'''===
+
Toggles Self-Shadowing on or off.
+
==='''Sky'''===
+
Toggles sky on or off.
+
==='''Sun Beams'''===
+
Toggles sun beams on or off.
+
==='''Map Border'''===
+
Toggles map border on or off.
+
==='''Texture Layer Indicator'''===
+
Toggles Layer Indicator on or off.
+
+
==='''BLOCKING'''===
+
+
Toggle display of blocking information in a map.
+
+
==='''BLOCKING VISUALIZATION SETTINGS'''===
+
+
Open the Blocking Visualization Settings window that allows you to change the display option of View Blocking.
+
+
==SETTINGS==
+
[[File:Settings.jpg|thumb|Settings]]
+
+
<br />
+
+
==='''APPLICATION'''===
+
+
Opens the Application Setting window, which lets you configure the Last recently files list, Backups, Autosave<br />and Autofocus.
+
+
==='''PLUG-INS'''===
+
+
Opens the Plug-Ins window, where you can turn plug-ins on or off, turn autoload of plug-ins on or off and<br />which lets you configure the plug-ins.
+
+
==Windows==
+
===[[File:Windows.jpg|thumb|Windows]]===
+
==='''Blocking Tool'''===
+
To ban player units or computer controlled units to walk where ever they want you need blocking elements (block bits). Learn everything about blocking [http://battleforge.wikia.com/wiki/Blocking_Tool here].
+
==='''Blocking Visualization Settings'''===
+
To visualize which area is blocked or not you need the Blocking Visualization Settings, click [http://battleforge.wikia.com/wiki/Blocking_Visualization_Settings here].
+
==='''Cutscene Editor'''===
+
How to create simple cutscenes, click [http://battleforge.wikia.com/wiki/Cutscene_Editor here]..
+
==='''Debug Window'''===
+
==='''Entity List'''===
+
To get information about every entity (buildings, units, objects...) you have placed in your map open the Entity List, click [http://battleforge.wikia.com/wiki/Entity_List here].
+
==='''Entity Placement'''===
+
This is the entity (buildings, units, objects...) library with include all the assets which Phenomic uses for BattleForge. Click [http://battleforge.wikia.com/wiki/Entity_Placement here] to get more information.
+
==='''Entity Properties'''===
+
If you need special informations about a single entity (building, units, object...) or to name (tag) it use the Entity Properties Tool, click [http://battleforge.wikia.com/wiki/Entity_Properties here].
+
==='''Goto Grid Tool'''===
+
If you want to create the walking path for your computer controlled units you need this tool, click [http://battleforge.wikia.com/wiki/Goto_Grid_Tool here]. for more informations.
+
==='''Grid Manager'''===
+
This tool will paint a helping grid at the top of your map. It is very helpful if you need a symmetrical map layout. You can also place entities (buildings, units, objects...) by snap to grid, for more information click [http://battleforge.wikia.com/wiki/Grid_Manager here].
+
==='''Height Tool'''===
+
A very important tool if you want to transform the surface of your map, click [http://battleforge.wikia.com/wiki/Height_Tool here] for more information.
+
==='''History'''===
+
==='''Map Patch Tool'''===
+
==='''Performance Lights'''===
+
This is a useful tool to control the performance of your map, click [http://battleforge.wikia.com/wiki/Performance_Lights here] to get more details.
+
==='''Script Group Editor'''===
+
Useful tool to group single named (taged) entities (buildings, units, objects...) into one script group, using them in your script. Click [http://battleforge.wikia.com/wiki/Script_Group_Editor here] for a guidance.
+
==='''Scripting Tool'''===
+
Tool to create trigger areas or patrol walking pathes for computer controlled units. Click [http://battleforge.wikia.com/wiki/Scripting_Tool here] for more information.
+
==='''Sound Tool'''===
+
To implement complex atmo sound into your world open this tool. See details [http://battleforge.wikia.com/wiki/Sound_Tool here].
+
==='''Terrain Cliffs'''===
+
To create these typically cliffs in BattleForge you need to open this tool. Click [http://battleforge.wikia.com/wiki/Terrain_Cliffs here] for more information.
+
==='''Texture Tool'''===
+
Also a very important tool for creating the surface of your map. With the Texture Tool you can transform areas of your map into deserts, greenlands, snowlands....Click [http://battleforge.wikia.com/wiki/Texture_Tool here]. fore a guidance.
+
==='''Water Tool'''===
+
If you want to create lakes, ponds anything with water you will need this tool. Click [http://battleforge.wikia.com/wiki/Water_Tool here] for more information.
Create a new map. Select the size the map should have an click on OK.
Keyboard Shortcut: CTRL + N For more informations click here.
OPEN
Open an existing map. In the dialogue, navigate the directory tree to find the map. Then, click OPEN.
Keyboard Shortcut: CTRL + O
SAVE
Save changes you made to an existing map. If the current map is new, then you must enter a filename.
Keyboard Shortcut: CTRL + S
SAVE AS...
Save the current map under a filenamenter a filename.
Keyboard Shortcut: CTRL + SHIFT + S
Close
Close the current map.
New Random Map
Opens a window where you can create a random generated map. For a detail description click here.
IMPORT HEIGHTMAP
Import a picture with height information into the map to create the landscape. You have to load or create a new
map before, to use this feature.
The picture has to be the same size like the map. If the map has the size of 512x512, then the picture has to be the same size in pixel.
You can set the height of the heightmap in the Import Heightmap window. You can set on which height, in
meter, the color white in the heightmap shall be. All the other height informations will be calculated accordingly
of this size.
EXPORT HEIGHTMAP
Export the height information into a picture. You have to choose the filename and location where you want to save the picture.
After saving the picture you receive informations about the map, what the size of the map is and what the heightest point in the map is.
If you want to import this heigthmap then you can use thise height information to get the same map.
RECENTLY USED FILES
Shows you the last used maps. Per default you will see the last 10 maps.
To open a map, click on it.
QUIT
Close the editor. If the map is in an unsaved state, then a dialogue will open, where you can change if you want to save the map, discard your changes or cancel the close action.
Keyboard Shortcut: CTRL + Q
Edit Menu
Edit Menu
UNDO
Remove the last operation performed on your map.
Keyboard Shortcut: CTRL + Z
REDO
Perform again the last operation that was undone.
Keyboard Shortcut: CTRL + SHIFT + Z
HISTORY
Open the History window, that allows you also to Undo and Redo your work.
Keyboard Shortcut: CTRL + Z
Copy
Copies an entity (building, unit, object...) into the temporary buffer storage.
Keyboard Shortcut: CTRL + C
Paste
Paste an entity from the temporary buffer storage into your map.
Keyboard Shortcut: CTRL + V
TOOLS MENU
Tool Menu
SELECTION
Activates the Selection mousetool, which allows you to select entities in the map. Detail information here Keyboard Shortcut: Q
HEIGHT MODIFIER
Activates the Height mousetool, which allows you to change the height of a map in a additive way. Keyboard Shortcut: H
FIXED HEIGHT MODIFIER
Activates the Fixed Height mousetool, which allows you to set party of a map to a fixed height. Keyboard Shortcut: F
TERRAIN SMOOTHING
Activates the Smoothing mousetool, which allows you to flatten parts of a map, when they are too rough. Keyboard Shortcut: S
TEXTURE MODIFIER
Activates the Texture mousetool, which allows you to paint textures with a fixed opacity on a map . Keyboard Shortcut: T
ADDITIVE TEXTURE MODIFIER
Activates the Additive Texture mousetool, which allows you to paint textures with additive opacity. Keyboard Shortcut: A
OBJECT PLACEMENT
Activates the Object mousetool, which allows you to place objects in a map. Keyboard Shortcut: O
SQUAD PLACEMENT
Activates the Squad mousetool, which allows you to place squads in a map. Keyboard Shortcut: U
BUILDING PLACEMENT
Activates the Building mousetool, which allows you to place buildings in a map Keyboard Shortcut: B
MISC PLACEMENT
Activates the Misc mousetool, which allows you to place misc entities, such as Static Building Places, in a map. Keyboard Shortcut: M
TERRITORY MODIFIER
Activates the Territory mousetool, which allows you to paint territories in a map. Keyboard Shortcut: Y
FORTRESS MODIFIER
Activates the Fortress mousetool, which allows you to place building zones for fortresses in a map. Keyboard Shortcut: R
ATMO ZONE MODIFIER
Activates the Atom Zone mousetool, which allows you to paint atomspheric sound zone in a map. Keyboard Shortcut: Z
EFFECT ZONE MODIFIER
Activates the Effect Zone mousetool, which allows you to paint effect zones in a map, which affects all sounds that will be played within this tone Keyboard Shortcut: X
BLOCKING MODIFIER
Activates the Blocking mousetool, which allows you to paint blocking information in a map. Keyboard Shortcut: L
HEIGHT TOOL
Open the Properties Window for the Height Tool, where you can adjust the settings for the Height Modifier, Fixed Height Modifier and Terrain Smoothing mousetools. Keyboard Shortcut: SHIFT + F
TEXTURE TOOL
Open the Properties Window for the Texture Tool, where you can create texture layers and assign texture the layers before painting them on the map. Keyboard Shortcut: SHIFT + T
ENTITY PLACEMENT
Open the Properties Window for the Entity Placement, where you can place squads, buildings, objects and misc entities. Keyboard Shortcut: SHIFT + E
ENTITY PROPERTIES
Open the Properties Window for selected Entities, where you can change the properties of the entity or entities. Keyboard Shortcut: SHIFT + P
ENTITY LIST
Open the Entity List Window, where you can search for entities and get a better overview about the placed entities. Keyboard Shortcut: SHIFT + L
TERRITORY TOOL
Open the Properties Window for the Territory Tool, where you can create territories, delete them and adjust the settings of the Territory Modifier. Keyboard Shortcut: SHIFT + Y
FORTRESS TOOL
Open the Properties Window for the Fortress Tool, where you can adjust the settings of the Fortress Modifier, create new blocking zones and delete unused ones. Keyboard Shortcut: SHIFT + R
SOUND TOOL
Open the Properties Window for the Sound Tool, where you can adjust the settings of the Sound Modifier and change the properties of placed sound zones. Keyboard Shortcut: SHIFT + Z
BLOCKING TOOL
Open the Properties Window for the Blocking Tool, where you can adjust the settings of the Blocking Modifier and choose the type of blocking. Keyboard Shortcut: SHIFT + B
GRID MANAGER
Open the Grid Manager Window, where you can turn on the snap to grid option for placing entities and where you can manage your grids, create new help grids and delete old ones. Keyboard Shortcut: SHIFT + G
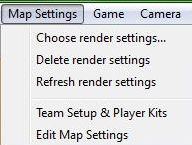
MAP SETTINGS MENU
Map Settings
CHOOSE RENDERSETTINGS
Load a weather file into the map. A weather file is used to define the atmosphere like the density of the fog, the air colors, etc... In the dialogue window, navigate the directory tree to find the file. Then, click OPEN.
DELETE RENDERSETTINGS
Unload the currently assigned weather file from the map.
REFRESH RENDERSETTINGS
Reload the assigned weather file.
TEAM SETUP & PLAYER KITS
Open the window that allows you to create team setups and player kits, which are needed to run your map.
Activate the editor camera, which can be moved, rotated and zoomed without restrictions.
INGAME CAMERA
Activate the ingame camera, which can be moved and rotated. This Camera is the same that I used in the game. Keyboard Shortcut: CTRL + SHIFT + E Keyboard Shortcut: CTRL + SHIFT + I
CONFIGURE
Open the configuration window which allows you to change the scroll speed and inverting of the camera controls.
RENDER FILTER MENU
Render Filter
FILTER OBJECTS
Toggle display of objects in the map.
FILTER SQUADS
Toggle display of squads in the map.
FILTER BUIDLINGS
Toggle display of buidlings in the map.
FILTER WATER
Toggle display of water in the map.
FILTER ZONES
Toggle display of zones, like atmo zones, in the map.
FILTER MISC
Toggle display of misc entities, like static building places, in the map.
VIEW MENU
View Menu
Shader LOD
Here you can choose the Shader "Level Of Detail", from Low, Medium, High and very High.
Cloud Shadows
Toggles clouds shadows on or off.
Glow
Toggles glow on or off.
Distance Fog
Toggles distance fog on or off.
Shadows
Toggles shadows on or off.
Self-Shadowing
Toggles Self-Shadowing on or off.
Sky
Toggles sky on or off.
Sun Beams
Toggles sun beams on or off.
Map Border
Toggles map border on or off.
Texture Layer Indicator
Toggles Layer Indicator on or off.
BLOCKING
Toggle display of blocking information in a map.
BLOCKING VISUALIZATION SETTINGS
Open the Blocking Visualization Settings window that allows you to change the display option of View Blocking.
SETTINGS
Settings
APPLICATION
Opens the Application Setting window, which lets you configure the Last recently files list, Backups, Autosave and Autofocus.
PLUG-INS
Opens the Plug-Ins window, where you can turn plug-ins on or off, turn autoload of plug-ins on or off and which lets you configure the plug-ins.
Windows
Windows
Blocking Tool
To ban player units or computer controlled units to walk where ever they want you need blocking elements (block bits). Learn everything about blocking here.
Blocking Visualization Settings
To visualize which area is blocked or not you need the Blocking Visualization Settings, click here.
To get information about every entity (buildings, units, objects...) you have placed in your map open the Entity List, click here.
Entity Placement
This is the entity (buildings, units, objects...) library with include all the assets which Phenomic uses for BattleForge. Click here to get more information.
Entity Properties
If you need special informations about a single entity (building, units, object...) or to name (tag) it use the Entity Properties Tool, click here.
Goto Grid Tool
If you want to create the walking path for your computer controlled units you need this tool, click here. for more informations.
Grid Manager
This tool will paint a helping grid at the top of your map. It is very helpful if you need a symmetrical map layout. You can also place entities (buildings, units, objects...) by snap to grid, for more information click here.
Height Tool
A very important tool if you want to transform the surface of your map, click here for more information.
History
Map Patch Tool
Performance Lights
This is a useful tool to control the performance of your map, click here to get more details.
Script Group Editor
Useful tool to group single named (taged) entities (buildings, units, objects...) into one script group, using them in your script. Click here for a guidance.
Scripting Tool
Tool to create trigger areas or patrol walking pathes for computer controlled units. Click here for more information.
Sound Tool
To implement complex atmo sound into your world open this tool. See details here.
Terrain Cliffs
To create these typically cliffs in BattleForge you need to open this tool. Click here for more information.
Texture Tool
Also a very important tool for creating the surface of your map. With the Texture Tool you can transform areas of your map into deserts, greenlands, snowlands....Click here. fore a guidance.
Water Tool
If you want to create lakes, ponds anything with water you will need this tool. Click here for more information.


